> ## Documentation Index
> Fetch the complete documentation index at: https://docs.catproxy.io/llms.txt
> Use this file to discover all available pages before exploring further.
# API Keys
> Create, scope, and revoke API keys from the dashboard to control programmatic access to your account.
API keys let you authenticate requests to the Catproxy Public API without using your account password. You can create multiple keys with different permissions - for example, a read-only key for a monitoring script and a write key for a provisioning pipeline.
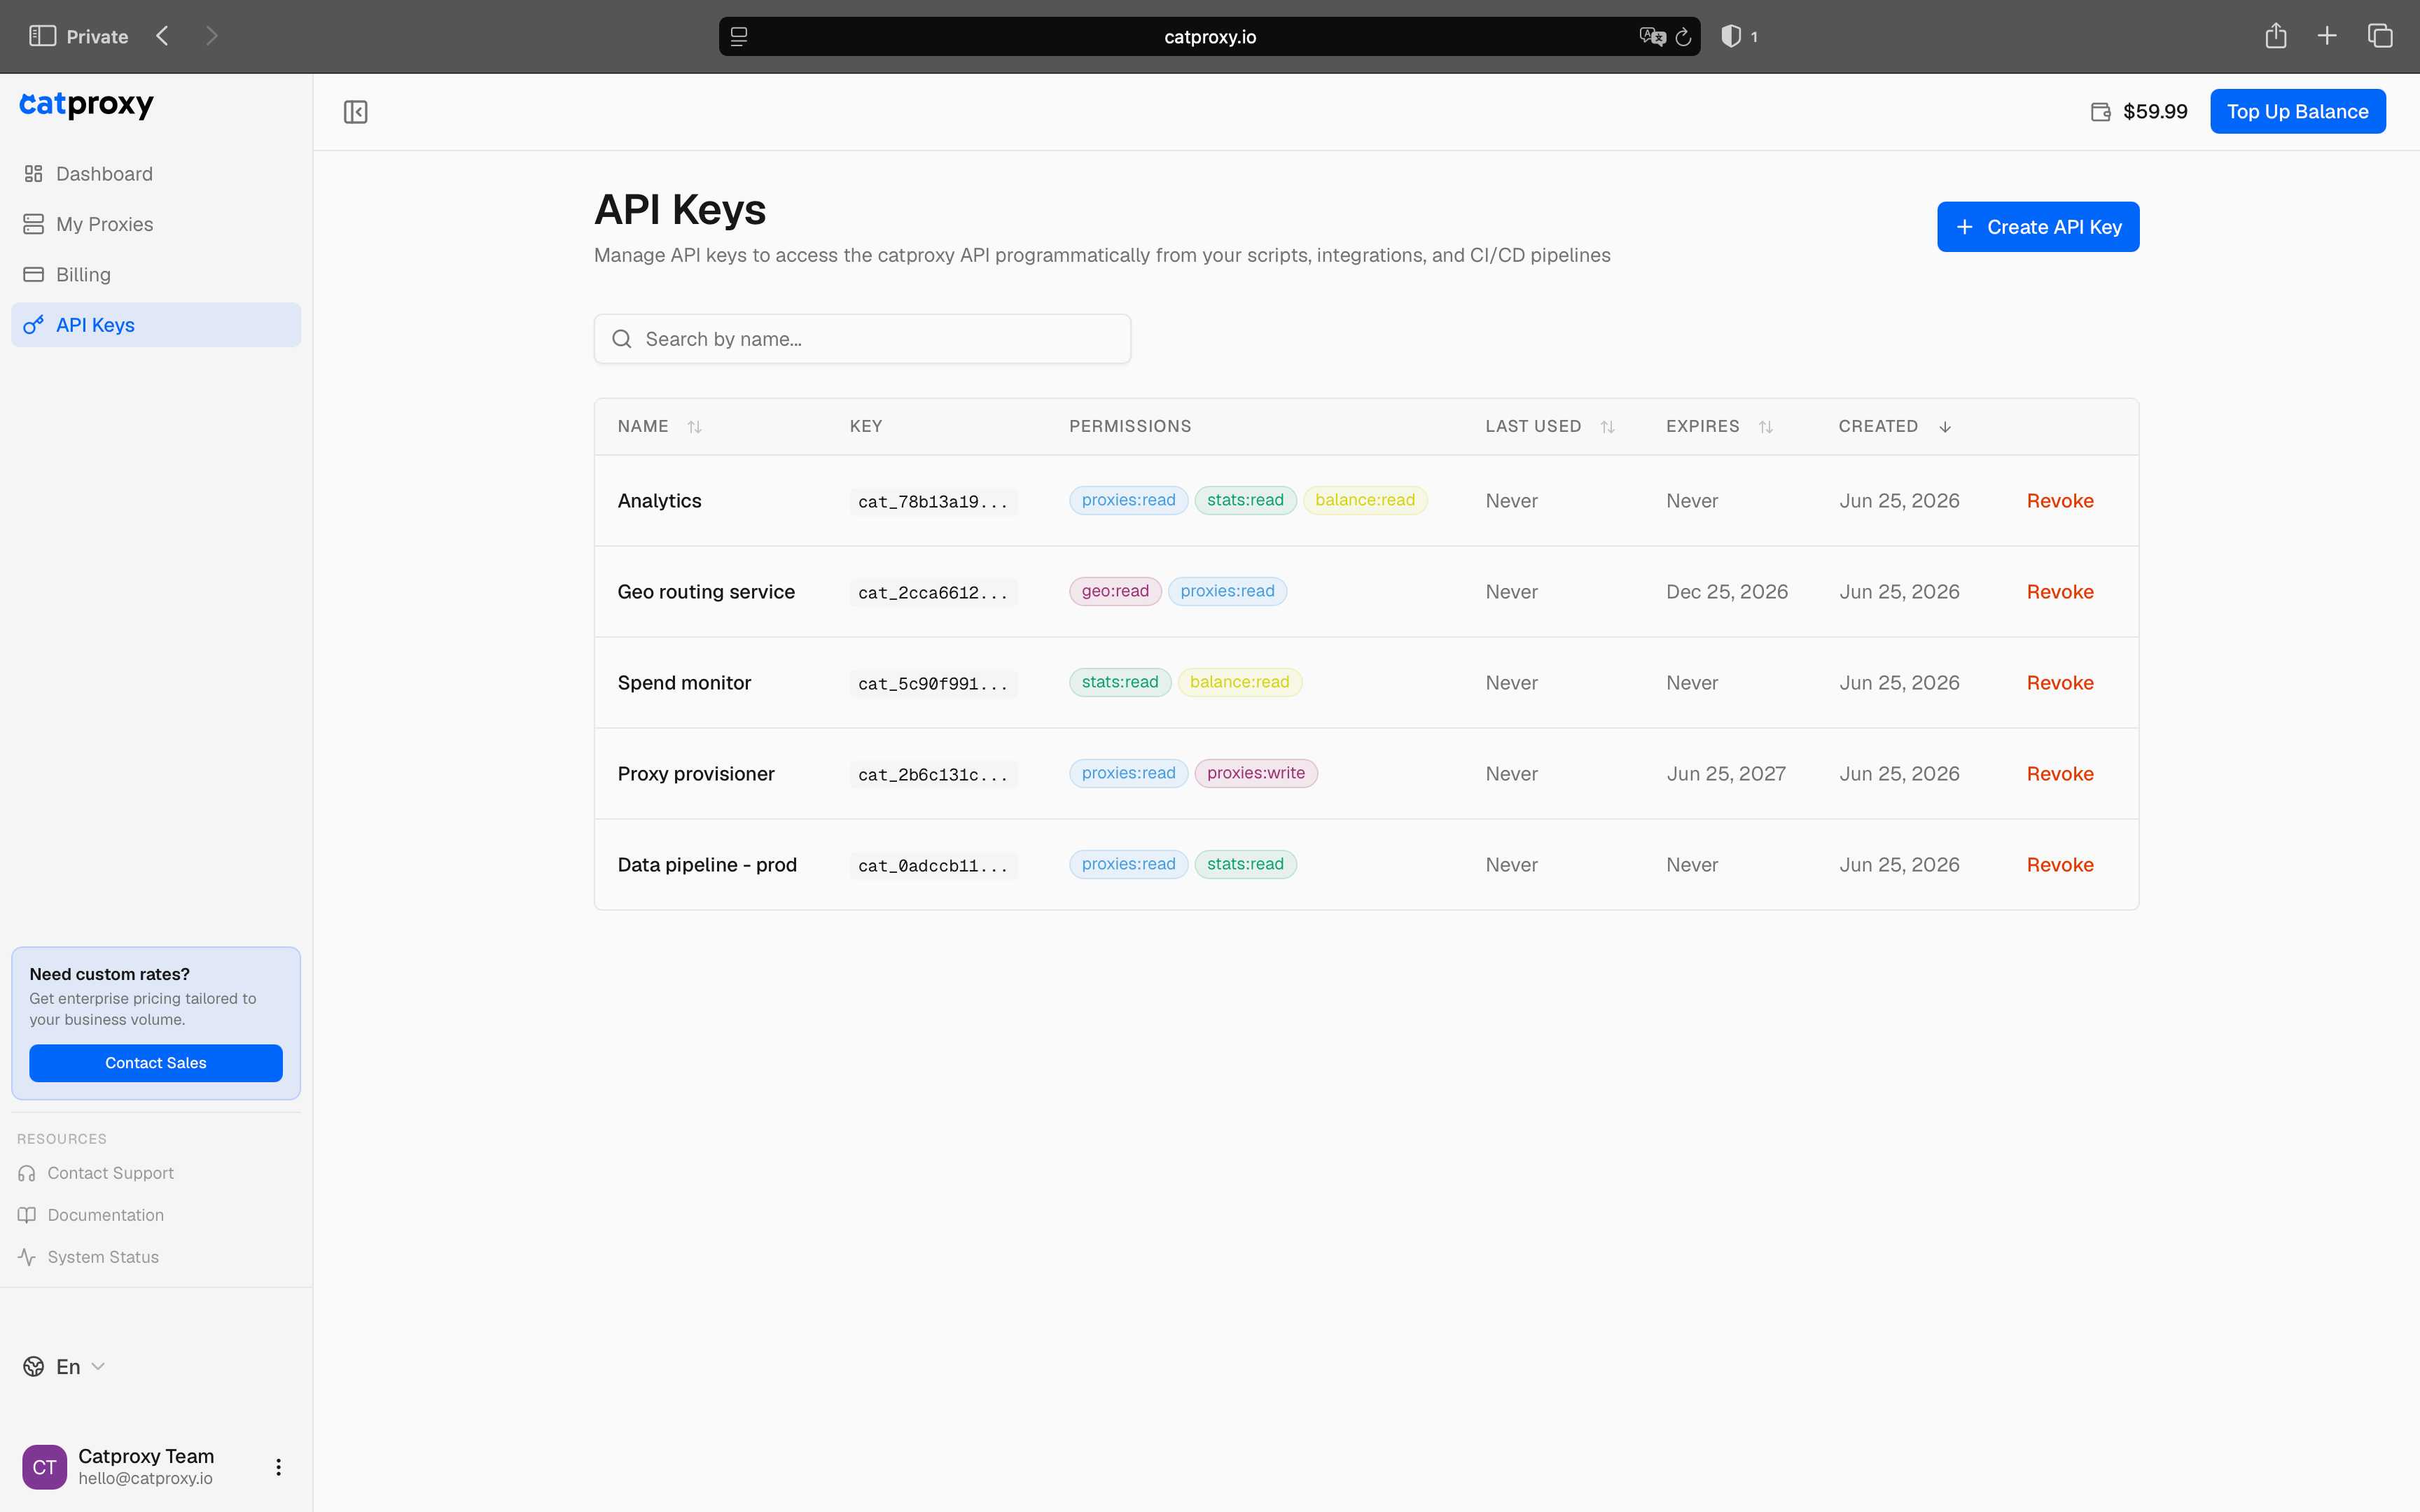
All key management happens on the **API Keys** page in the sidebar of your dashboard:
**[Dashboard](https://catproxy.io/app) → API Keys**
 ***
## Creating a key
Click **Create API Key** to open the creation dialog. Fill in three fields:
**Name** - a descriptive label so you can identify the key later (e.g. `Automation script`, `CI pipeline`).
**Permissions** - select the access scopes the key needs. Permissions are grouped by area:
| Permission | What it allows |
| :-------------- | :--------------------------------------------------------------- |
| `proxies:read` | List and retrieve proxy details and configuration |
| `proxies:write` | Create, update, and delete proxies; manage limits and whitelists |
| `geo:read` | Access geo directory (countries, states, cities, ZIP codes) |
| Permission | What it allows |
| :----------- | :----------------------------------------------- |
| `stats:read` | View traffic statistics and export usage reports |
| Permission | What it allows |
| :------------- | :------------------------------------------------------------- |
| `balance:read` | View account balance, transaction history, and available plans |
`proxies:write` does **not** include `proxies:read` - assign both if your integration needs to both create and read proxies.
**Expiration** - choose how long the key stays valid:
| Option | Duration |
| :------------ | :------------------------ |
| 30 days | Key expires in 30 days |
| 90 days | Key expires in 90 days |
| 6 months | Key expires in 6 months |
| 1 year | Key expires in 1 year |
| No expiration | Key is valid indefinitely |
Click **Create API Key** to generate the key.
***
## Saving the key
After creation, the **Your New API Key** dialog appears with the full key value and a **Copy** button.
This API key will not be shown again. Copy it and store it in a safe place, such as a password manager or a secrets vault. If you lose it, revoke the key and create a new one.
Click **Done** to close the dialog. From this point, only the key prefix (e.g. `cat_20fe...`) is visible in the table.
***
## Viewing and managing keys
The API Keys page lists all active keys in a table with the following columns:
| Column | Description |
| :-------------- | :------------------------------------------------- |
| **Name** | The label you set at creation |
| **Key** | Truncated key prefix (e.g. `cat_20fe...`) |
| **Permissions** | Scopes granted to this key |
| **Last used** | When the key last authenticated a request |
| **Expires** | Expiration date, or empty if no expiration was set |
| **Created** | When the key was generated |
Use the search field to filter keys by name. Columns can be sorted by clicking the column header.
You can have up to **10 API keys** per account. To create a new one when at the limit, revoke an existing key first.
***
## Revoking a key
Click **Revoke** next to any key to open the confirmation dialog. Confirm by clicking **Revoke** in the **Revoke API Key** dialog.
Revocation is immediate - any requests using the key will start returning `401 Unauthorized` instantly. This action is irreversible.
Revoke a key immediately if:
* It was accidentally committed to a repository
* A team member who had access has left
* You suspect it was leaked or compromised
***
## Security best practices
Each script or service should have its own key. This way you can revoke a single key without affecting other integrations.
A monitoring script only needs `stats:read`. A provisioning pipeline needs `proxies:write`. Never grant more than required.
Never hardcode keys in source code. Store them in environment variables or a secrets manager (Vault, AWS Secrets Manager, etc.).
Prefer keys with an expiration date over indefinite ones. Rotate before expiry by creating a replacement key, updating your integration, then revoking the old one.
***
## Creating a key
Click **Create API Key** to open the creation dialog. Fill in three fields:
**Name** - a descriptive label so you can identify the key later (e.g. `Automation script`, `CI pipeline`).
**Permissions** - select the access scopes the key needs. Permissions are grouped by area:
| Permission | What it allows |
| :-------------- | :--------------------------------------------------------------- |
| `proxies:read` | List and retrieve proxy details and configuration |
| `proxies:write` | Create, update, and delete proxies; manage limits and whitelists |
| `geo:read` | Access geo directory (countries, states, cities, ZIP codes) |
| Permission | What it allows |
| :----------- | :----------------------------------------------- |
| `stats:read` | View traffic statistics and export usage reports |
| Permission | What it allows |
| :------------- | :------------------------------------------------------------- |
| `balance:read` | View account balance, transaction history, and available plans |
`proxies:write` does **not** include `proxies:read` - assign both if your integration needs to both create and read proxies.
**Expiration** - choose how long the key stays valid:
| Option | Duration |
| :------------ | :------------------------ |
| 30 days | Key expires in 30 days |
| 90 days | Key expires in 90 days |
| 6 months | Key expires in 6 months |
| 1 year | Key expires in 1 year |
| No expiration | Key is valid indefinitely |
Click **Create API Key** to generate the key.
***
## Saving the key
After creation, the **Your New API Key** dialog appears with the full key value and a **Copy** button.
This API key will not be shown again. Copy it and store it in a safe place, such as a password manager or a secrets vault. If you lose it, revoke the key and create a new one.
Click **Done** to close the dialog. From this point, only the key prefix (e.g. `cat_20fe...`) is visible in the table.
***
## Viewing and managing keys
The API Keys page lists all active keys in a table with the following columns:
| Column | Description |
| :-------------- | :------------------------------------------------- |
| **Name** | The label you set at creation |
| **Key** | Truncated key prefix (e.g. `cat_20fe...`) |
| **Permissions** | Scopes granted to this key |
| **Last used** | When the key last authenticated a request |
| **Expires** | Expiration date, or empty if no expiration was set |
| **Created** | When the key was generated |
Use the search field to filter keys by name. Columns can be sorted by clicking the column header.
You can have up to **10 API keys** per account. To create a new one when at the limit, revoke an existing key first.
***
## Revoking a key
Click **Revoke** next to any key to open the confirmation dialog. Confirm by clicking **Revoke** in the **Revoke API Key** dialog.
Revocation is immediate - any requests using the key will start returning `401 Unauthorized` instantly. This action is irreversible.
Revoke a key immediately if:
* It was accidentally committed to a repository
* A team member who had access has left
* You suspect it was leaked or compromised
***
## Security best practices
Each script or service should have its own key. This way you can revoke a single key without affecting other integrations.
A monitoring script only needs `stats:read`. A provisioning pipeline needs `proxies:write`. Never grant more than required.
Never hardcode keys in source code. Store them in environment variables or a secrets manager (Vault, AWS Secrets Manager, etc.).
Prefer keys with an expiration date over indefinite ones. Rotate before expiry by creating a replacement key, updating your integration, then revoking the old one.